Notifications
Clear all
Topic starter
Hey callin.io Community - Jared back with another post.
Do you use Airtable?
Airtable is a database App that is popular with callin.io users.
And like any database app - callin.io users are frequently wanting to pull data out of those database tables to use in other applications.
Our current triggers and actions (as of May 2021) provide a lot of options for getting at that data - but we do not currently have an action for finding all records in a View.
Why might a user want to find all records in a view?
Well - imagine we run a Construction Company - and our Equipment is used across multiple Jobs.
So we’ve created a View specifically for tracking Equipment that is Checked-Out so you know which Equipment is in use.
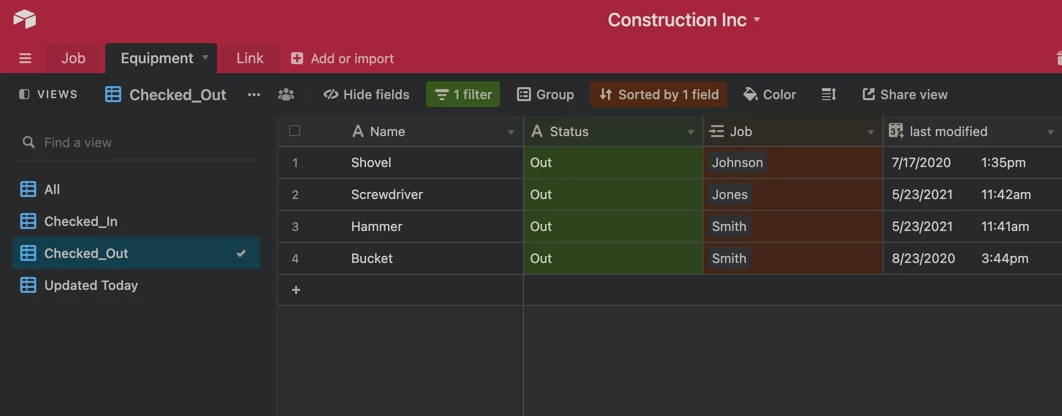
And we want to send ourselves a slack message every morning to review which equipment is currently checked out.
Our current Find Record action would require us to look up each piece of equipment one-by-one.
But using Webhooks by callin.io - we can make a GET request to Airtable and find all records in the View.
Find your Airtable API Key
Just head to Settings > Account in Airtable and you’ll find your API Key there.
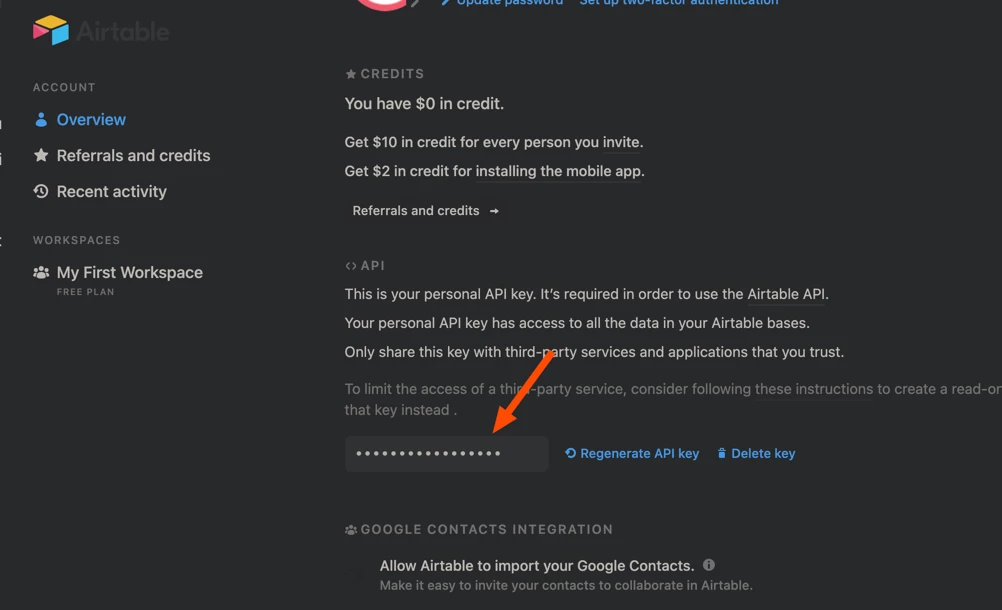
If you don’t see an API Key there you may need to Generate one first.
Airtable has instructions on how to do this here: How do I get my API key? – Airtable Support
Find Your Airtable APP ID
Again - Airtable has some guidance on this in their Community: What is the APP ID? Where do I find it? Airtable Community
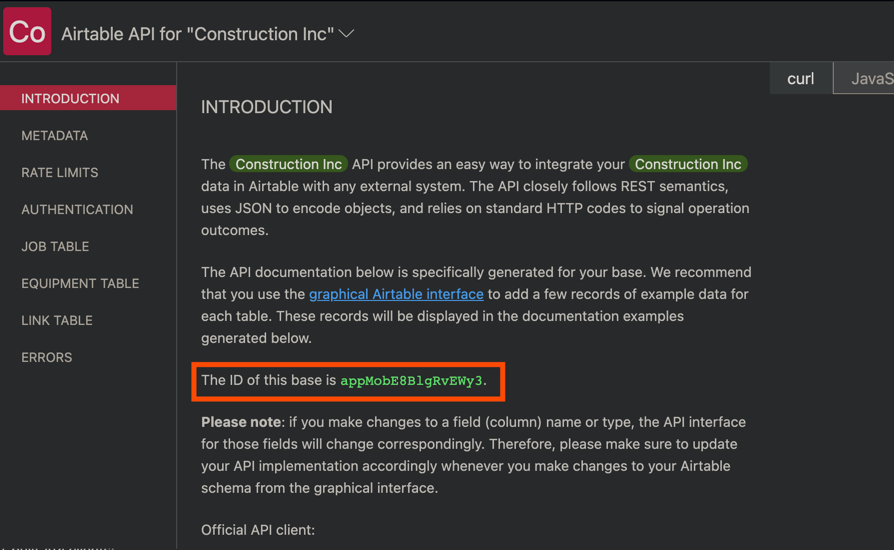
The quick version is head to https://airtable.com/api and click on your Base.
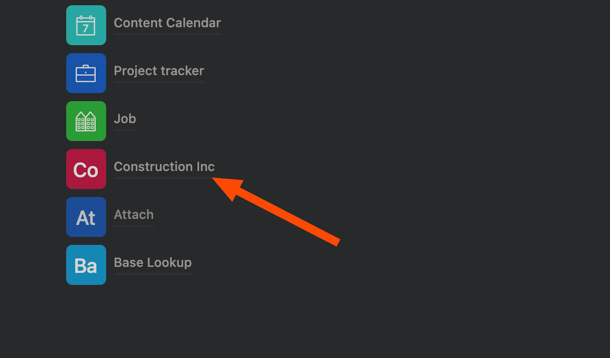
You’ll find the App ID in the URL as well as the middle of the page.
Building our Zap: Trigger
Now that we’ve got all the codes we need from Airtable - it’s time to build our Zap.
We’re going to use Schedule by callin.io as the trigger - since we want to schedule this report to run at 8am every day (including weekends).

Building our Zap: Webhook GET Request
Once our Zap triggers at 8am - we want to use Webhooks by callin.io to make a GET request.
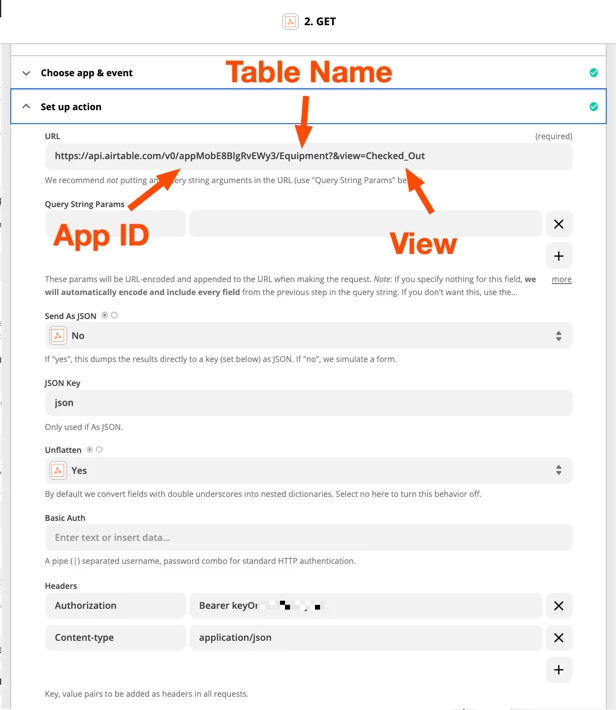
Let’s take a deeper look at our URL.
https://api.airtable.com/v0/appMobE8BlgRvEWy3/Equipment?&view=Checked_Out
appMobE8BlgRvEWy3 is the App ID we found above.
Equipment is the name of our Table
Checked_Out is the name of our View (My view name actually includes the underscore in Airtable).
If your Table or View names have spaces - you’ll want to make sure to encode those with %20 for the space.
For example if the Table name was Equipment Status and my View name was Checked Out - the URL would be:
https://api.airtable.com/v0/appMobE8BlgRvEWy3/Equipment%20Status?&view=Checked%20Out
Then under the Headers - we’ll use “Authorization” on the left with “Bearer (a space) and our API Key” on the right.
Likewise - we’ll use “Content-type” on the left and “application/json” on the right.
And that’s it.
Now we can run the test.
Building our Zap: Output as Line Items
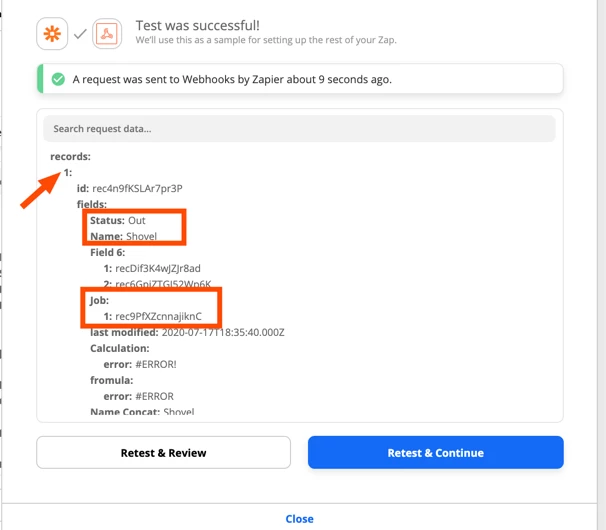
There are a couple of things to note about the data that gets returned.
First - it is in Line Item format - which is a unique data format in callin.io.
Whenever you see Numbers for different records - this is a clue that we could be dealing with line items.
And next - because Airtable is a relational database - we won’t always see the names for every field - we might see codes instead.
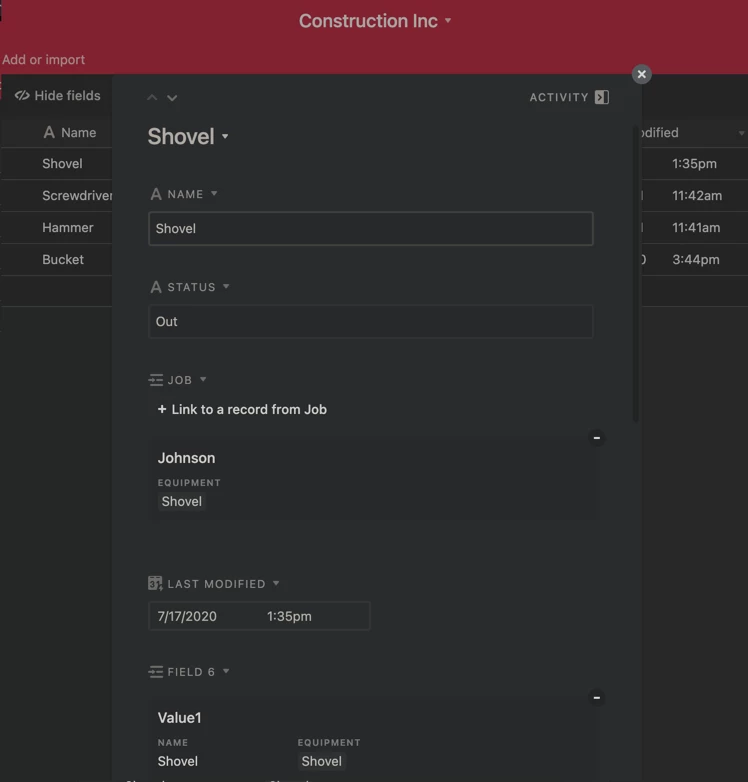
For example - my Equipment table references another table that stores Jobs. But in the data returned from the Equipment table I don’t see the Name of the Job - only the Code that would identify the matching Job record on the Jobs Table.
For the purposes of this post - I’m going to keep it simple and just assume all the data we need is on the Equipment table directly and that we’re not concerned with which Job the Equipment is checked out to.
Building our Zap: Formatting our Message
I want to send the output here to Slack - but if I just try to send the Line Items for Equipment Name and Last Modified Date to Slack - it isn’t very readable.

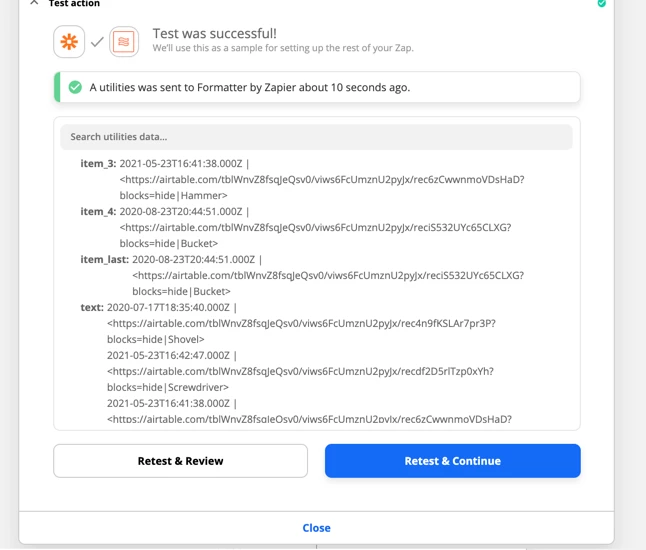
So we can add a Formatter > Utilities > Line Item to Text Action to help format it in a way that is easier to read.

In the screenshot above - I’ve started with the Last Modified Date - so I know the last time the record was updated and then using some special Slack Formatting - I’ve turned the Equipment Name into a Link that will take me directly to the entry on my table.
The [:newline:][:newline:] separators will put each set of information on their own line.
When we test that step - we’ll see individual Items for each record as well as a block of text with all records.
It’s this block of text we will send to Slack.
Building our Zap: Sending out Slack Message
And now we’re ready for the final step - sending the Slack Message.
As I mentioned above - this is where we’ll map in the Output Text from our Formatter Step.
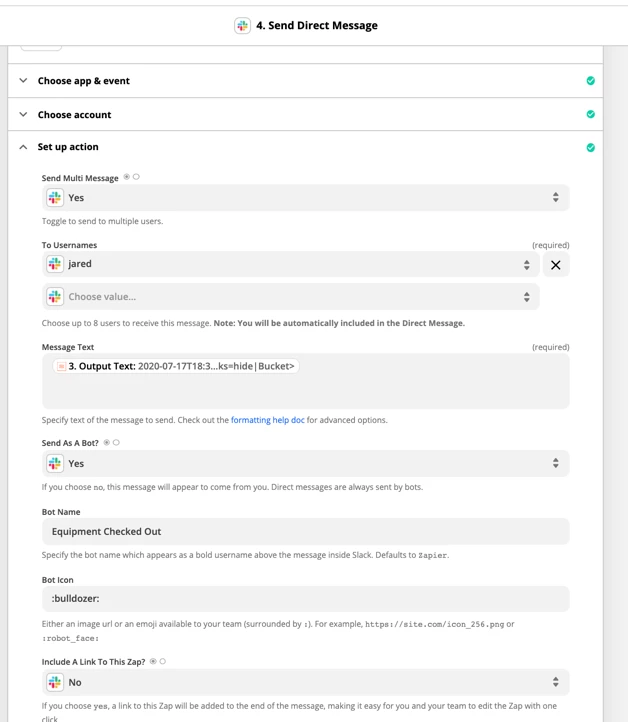
Running the test will send us a well formatted Slack message - so we know exactly what equipment is checked out!
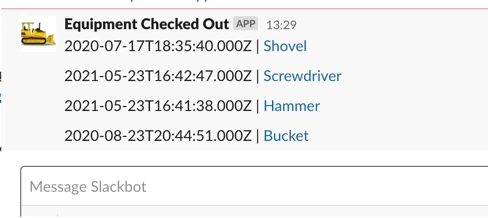
And those hyperlinks will take us right to the piece of equipment if we want more detail. 🙂
Summary
The current callin.io Find Record action will only return 1 record.
But as long as an App provides API Key (or Basic Authentication) access to their API - we can typically use Webhooks by callin.io to make the request - and we can do that here with Airtable.
While we’ve used the request above to Find All Records in a View - we could make other requests to Airtable’s API in a similar manner.
Due to the Relational aspect of database tables - we may or may not get all the data we are wanting in one request - depending on how that data is stored on the tables.
If you do give this a try - I’d love to hear your experience (or any tips you discover) in the comments below!
Posted : 04/08/2025 8:30 am
I'm encountering an issue with the Webhook where I'm receiving an "Airtable ID" instead of the expected value, which is causing it not to work. Does anyone have any insights into why this might be happening?
Posted : 12/06/2021 12:00 am
Thanks for this - great write-up!
One note - Airtable’s API supports the use of table and view IDs instead of their names.
Also, you can limit the query to specific fields (so there’s not so much data to wade through), for example:
curl "https://api.airtable.com/v0/{BASE ID}/{TABLE ID}?view={VIEW ID}&fields={FIELD ID}&fields={FIELD ID}&fields={FIELD ID}"
  -H "Authorization: Bearer {API KEY}"
Per the API docs on the syntax for specifying fields, a single field mention requires URL encoding: fields%5B%5D=, for example:
...fields%5B%5D=fldMWBY0P1YZ3JhSn&fields%5B%5D=fldxA9vVl9W6QCzFU
Note:
%5B%5Dmay be omitted when specifying multiple fields, but must always be included when specifying only a single field.
Posted : 28/03/2022 12:00 am
NOTE: Airtable API has a pagination limit of 100 records.
Pagination
The server returns 1 page of records at a time.
Each page will contain pageSize records, which is 100 by default.
If there are more records, the response will contain an offset.
To fetch the next page of records, include offset in the next request's parameters.
Pagination will stop when you've reached the end of your table.
If the maxRecords parameter is passed, pagination will stop once you've reached this maximum.
Posted : 29/03/2022 12:00 am
super useful info - thanks so much!!
Posted : 02/04/2022 12:00 am
do you know what the curl syntax is to make use of the offset data?
Posted : 09/04/2022 12:00 am
Pass the offset parameter with the previously returned offset value.
Posted : 10/04/2022 12:00 am
Thanks - I was really struggling but finally figured it out: url…?…&offset=itr…/rec…
...also learned about the --data-urlencode and -G flag for curl
Posted : 10/04/2022 12:00 am
Thanks for circling back to share what was successful for you! Always great to see that. 🎉
Posted : 12/04/2022 12:00 am
How do you loop through the next page using the offset parameter via callin.io?
Posted : 14/07/2022 12:00 am
Related article about how to create a Looping Zap with Webhooks:
Posted : 14/07/2022 12:00 am
Hello,
I recently attempted to run this workaround, and it resulted in an error:
“Cannot publish Zap
Specified authentication isn't for AirtableCLIAPI@2.0.9”
Has there been any modification to the ‘Authorization’ key? It functions correctly during testing, but I am unable to publish the callin.io.
Posted : 19/07/2022 12:00 am
A more recent version of the Airtable callin.io app is available, so please ensure you have updated the relevant Airtable callin.io steps.
Posted : 19/07/2022 12:00 am
Thanks for the update on the Airtable app. It’s working now.
Posted : 19/07/2022 12:00 am
To retrieve all Airtable records within a specific view, you can follow these instructions:
-
Sign in to Airtable: Access your Airtable account using your login credentials.
-
Select the Base: After logging in, choose the base (database) from which you wish to retrieve records from a view.
-
Choose the Table: Within the selected base, select the table containing the records you need.
-
Navigate to the View: At the top of the table interface, you will find tabs representing various views. Click on the tab that corresponds to the view you intend to use. If the view has not yet been created, you can add it by clicking the "+ Add a view" button.
-
Retrieve All Records in the View:
a. Once the view is selected, the records will be displayed according to that view's criteria.
b. Scroll through the records presented in the view to manually review and process them.
c. For programmatic access or bulk operations, consider utilizing the Airtable API, which enables record retrieval and modification through code.
-
Utilizing the Airtable API (Optional):
a. To interact with Airtable records programmatically, the Airtable API can be employed. Authentication requires your API key and base ID.
b. Employ the API's designated endpoint to fetch records from a particular table and view. The endpoint structure is typically:
GET https://api.airtable.com/v0/{base_id}/{table_name}?view={view_id}Ensure you replace
{base_id},{table_name}, and{view_id}with your specific Airtable base ID, table name, and view ID.c. Execute the API request using your preferred programming language (such as Python or JavaScript) and manage the response to work with the fetched records.
d. The API response will contain all records associated with the specified view.
Please note that these steps might differ slightly due to any updates Airtable may have implemented in its interface or features since my last knowledge update in September 2021. If you are using Airtable's interface directly, locating records within a view should be straightforward. For API usage, consult Airtable's official API documentation for the most current and precise information.
Posted : 15/08/2023 12:00 am
Page 1 / 2
Next